Focus Blue Quick Start Guide
Introduction
The Focus Blue line of refreshable braille displays provide a tactile interface to your computer or mobile device. Accessing information at your fingertips has never been easier with these compact and portable options.
The Focus Blue is available in 14, 40, or 80 refreshable braille cells and requires the use of a screen reader such as JAWS® for Windows. This Quick Start Guide is intended to provide the basic information you need to familiarize yourself with your Focus display and to get you up and running. For more detailed information, see the Focus Blue User Guide.
Focus Controls Overview
Watch a brief video highlighting the Focus 40 Blue’s controls, or continue reading for more details about the three models of Focus Blue braille displays.
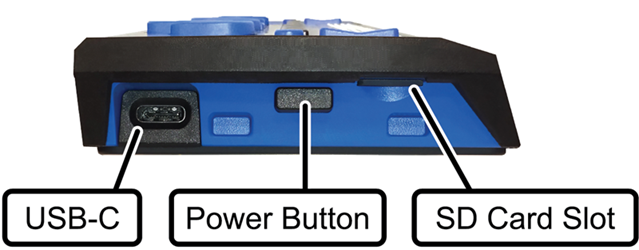
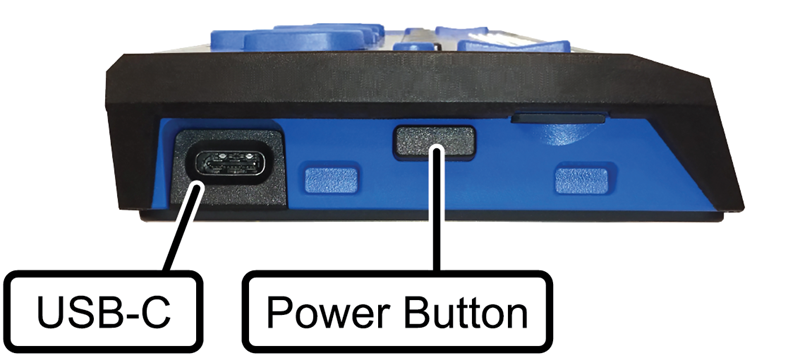
On the left side of the display, going from front to back, you will find a Micro SD slot which contains a Micro SD card, the Power button, and a micro USB-C port. The USB port allows you to connect the display to a computer using the supplied USB cable, or to the AC adapter.
The refreshable braille cells are located toward the front of the unit. A refreshable display creates braille by electronically raising and lowering different combinations of pins in each braille cell.

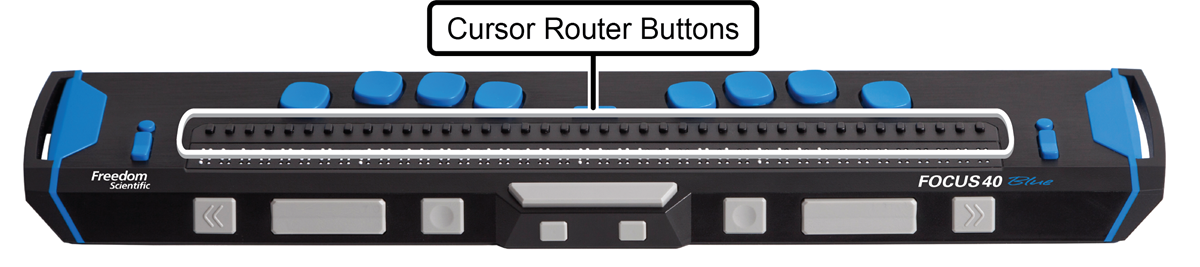
Above each braille cell is a Cursor Router button used for moving quickly to that location.
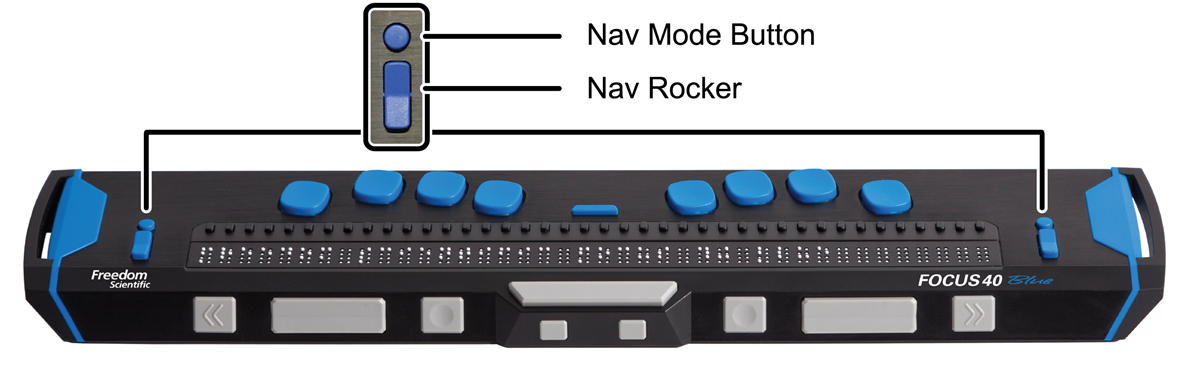
At each end of the display’s surface are NAV Rockers used for easy navigation. Positioned above each NAV Rocker is a NAV Mode button which cycles through the different navigation modes.
Positioned directly above the Cursor Router buttons, there are eight keys similar to those on a Perkins-style braille keyboard. These keys are used to enter text or perform commands.
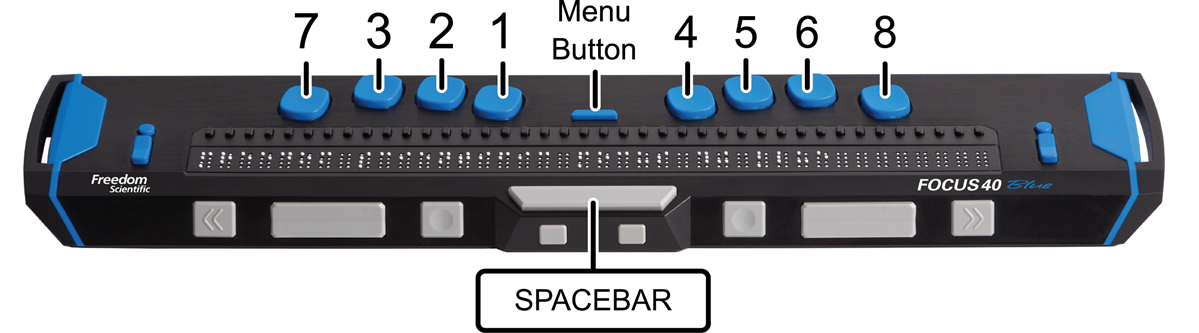
Starting center to left, with the left hand:
- Dot 1: index finger
- Dot 2: middle finger
- Dot 3: ring finger
- Dot 7: little finger
Starting center to right, with the right hand:
- Dot 4: index finger
- Dot 5: middle finger
- Dot 6: ring finger
- Dot 8: little finger
Between dots 1 and 4 is a Menu button which is used to access the Focus configuration menu as well as display Focus status information during an active connection. On the front edge, directly under and in the center of the display is a SPACEBAR. This key is used together with the braille keys when entering commands. A command that includes the SPACEBAR is commonly referred to as a chorded command. For example, L CHORD or DOTS 1-2-3 and the SPACEBAR.
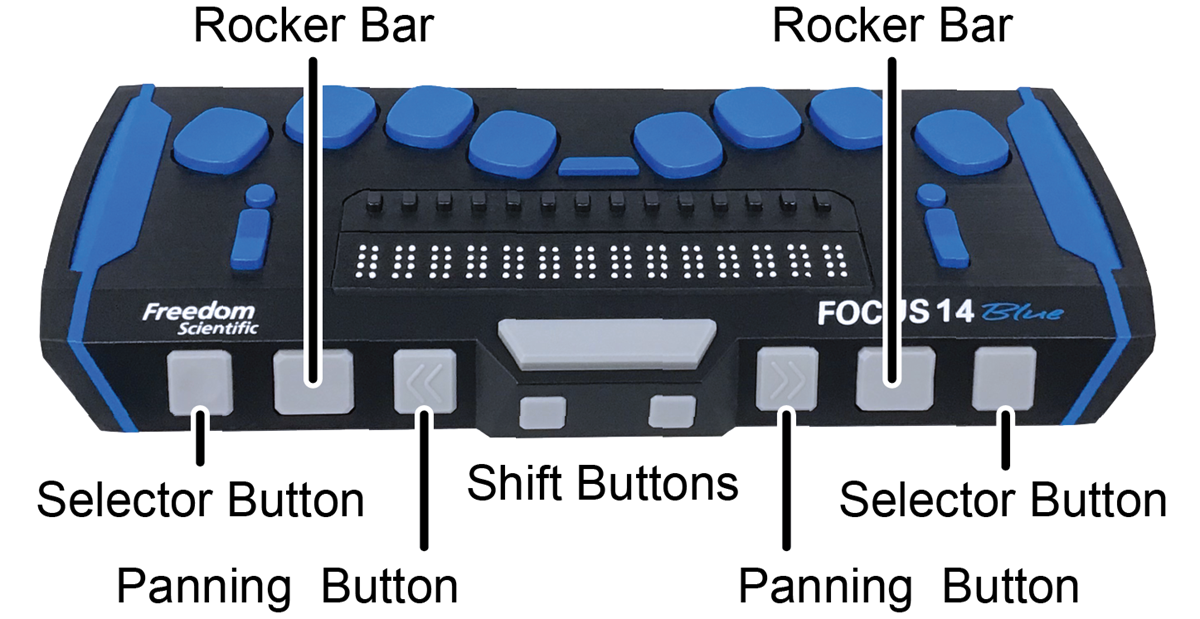
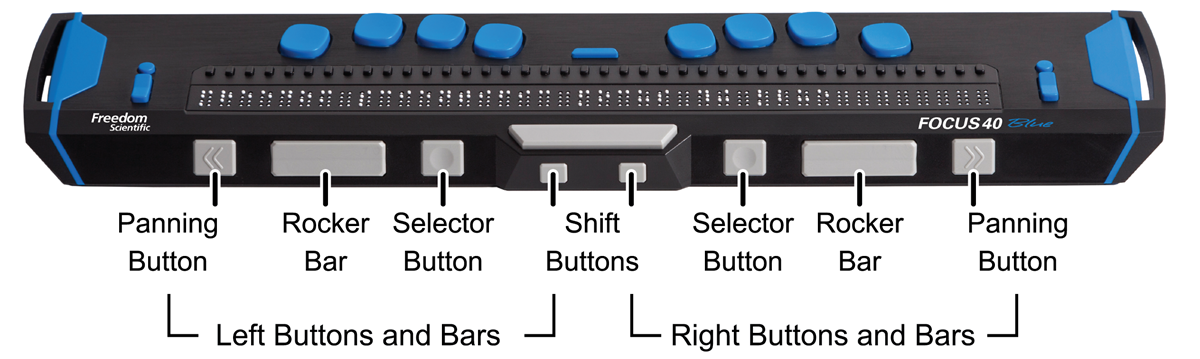
On the front edge of the display are the following controls, located from left to right. The layout of these controls is slightly different depending on what model of Focus you have.
• Focus 14: Left Selector button, Left Rocker bar, Left Panning button, Left Shift button, Right Shift button, Right Panning button, Right Rocker bar, and Right Selector button
• Focus 40: Left Panning button, Left Rocker bar, Left Selector button, Left Shift button, Right Shift button, Right Selector button, Right Rocker bar, and Right Panning button
• Focus 80: Left Panning button, Left Rocker bar, Left Selector button, two Left Panning rockers, Left Shift button, Right Shift button, two Right Panning rockers, Right Selector button, Right Rocker bar, and Right Panning button.

Note: The following sections describe how these controls work when using the Focus Blue with JAWS. If you choose to use the Focus display with a third-party screen reading application on a computer or mobile device, refer to the documentation that came with the software as the functions of these controls may be different from how they work with JAWS.
NAV Rockers and NAV Mode Buttons
The Focus NAV Rockers allow you to move quickly through files, dialog boxes, lists, and menus. In a file, you can move by line, sentence, paragraph, or pan backward and forward. To switch between the four navigation modes, press the NAV Mode button located directly above each NAV Rocker. In a dialog box, you can move between the available controls, and even interact with them. In a menu, you can move up and down through the menu items. You can also completely turn the NAV Rockers off by simultaneously pressing the Left or Right NAV Mode button and the SPACEBAR. Perform a Left or Right NAV Mode button CHORD once more to turn them back on.
Panning Buttons
The Focus Panning buttons pan left or right one display width each time they are pressed. Press the Left Panning button, the button with a raised double left arrow symbol, to pan left; press the Right Panning button, the button with a raised double right arrow symbol, to pan right. If you are using JAWS, the functions of the Panning buttons can be reversed so that pressing the Left Panning button causes the Focus display to pan right and pressing the Right Panning button causes it to pan left. To enable reverse panning, open JAWS Settings Center, search for “reverse panning”, and select the Reverse Panning Buttons check box.
Rocker Bars
The Rocker bars provide movement up or down by line. Press the top of the Rocker bar to move up one line; press the bottom of the Rocker bar to move down one line. The Rocker bars, in combination with the Panning buttons, move to the beginning or end of the line on which the cursor is positioned. Press a Panning button and the top of a Rocker bar to move to the start of the line. Press a Panning button and the bottom of a Rocker bar to move to the end of the line.
Selector Buttons
Used by themselves, the concave-shaped Selector buttons control Auto Advance. Press both Selector buttons together to toggle Auto Advance on or off. Press the Left Selector button to decrease the Auto Advance speed or press the Right Selector button to increase the Auto Advance speed.
When pressed in combination with other controls, the Selector buttons perform multiple functions. For instance, pressing a Selector button and the top or bottom of a Rocker bar performs a page up or page down. You can also press a Selector button and the Right or Left Panning button to move to the top or bottom of a file.
Panning Rockers (Focus 80 only)
The four Panning rockers on the Focus 80 function as extra panning buttons. However, they move in the same way as the Rocker bars. Press up on either of the Panning rockers to pan left and press down to pan right.
Shift Buttons
The Shift buttons are used in conjunction with the SPACEBAR, braille keys, and other controls to enter commands. For example, when using JAWS, pressing Left Shift+DOT 4 or DOT 1 selects the next or previous line in a document.
Cursor Router Buttons
There is a Cursor Router button located above each braille cell. Press a Cursor Router button to move the cursor to that point, or to select a link in a web page or email message. In line mode, press a Cursor Router button to open a menu or select menu items.
Press and hold the Left or Right Panning button while simultaneously pressing a Cursor Router button to simulate a right mouse click at that location.
You can also use the Cursor Routers to select text in documents. To select with the Cursor Router buttons, press and hold the Left Shift button, then press the Cursor Router button above the text where you want to begin the selection. Release both keys. Move to where you want to end the selection, and press the Left Shift button plus the Cursor Router button at that location. Use any navigation commands to move from the beginning point to the end point of the text you are selecting, even the NAV Rockers.
Turning the Focus On or Off
The Focus automatically powers on when you connect it to USB. Otherwise, press and hold the Power button for approximately two seconds to turn the display on and press and hold it for approximately three and a half seconds to turn the display off.
Charging the Focus
Use the AC adapter supplied with your unit to charge the battery. Charging time is three hours. The display also charges when connected to a PC over USB, however, charging time will be longer. As the Focus charges, the battery charging indicator, a circle of dots, is displayed to the right of the percentage until the unit reaches 100 percent.
When using the Focus on battery power, you will get approximately 20 hours for typical usage. To check the battery status while the display is in use, press the Menu button to display the percentage of battery charge used. Press the Left Selector button to return to normal operation.
Installing Focus Blue Display Drivers
In Microsoft Windows, JAWS automatically installs the files necessary to use the Focus Blue during the JAWS installation. However, if you choose to use the Focus display with another screen reading application, you must install the Windows driver. Go to the Focus Blue Braille Display Driver web page and follow the instructions to download and install this driver.
Note: Make sure you do not connect the display to your computer until after the driver is successfully installed.
On Apple Mac computers, the VoiceOver screen reader already includes the appropriate drivers necessary to use the Focus Blue.
Configuring the USB Connection for JAWS
Watch a brief video describing how to configure your braille display using a USB connection, or continue reading to learn more.
Note: If you are using a third-party screen reading application, refer to the documentation that came with the software as this procedure might be different.
- Establish a USB connection between the Focus and computer using the supplied USB cable.
- Close and then restart JAWS. JAWS automatically detects and begins using your Focus Blue braille display.
Configuring the Bluetooth Connection for JAWS
Watch a brief video describing how to pair your braille display with a computer using Bluetooth, or continue reading to learn more.
In order to use the Focus Blue wirelessly over Bluetooth, you must first configure a Bluetooth partnership between the Focus and computer.
- Make sure that Bluetooth is enabled on the computer running JAWS. If you are using an external USB Bluetooth adapter, insert it and ensure it is detected properly.
- Power on the Focus. The time and battery status information is displayed.
- On the computer, go to the Control Panel and type “bluetooth” into the Search edit box.
- Press TAB to move to Add Bluetooth Device and press ENTER. The computer will begin searching for Bluetooth devices. This may take several seconds. You are placed in the list of devices when the search is complete.
- Use the ARROW keys to select your Focus display from the list, for example, Focus 14 BT, Focus 40 BT, or Focus 80 BT, and then press ENTER. If the Focus display was not found, make sure it is turned on then select the Retry button.
- When prompted to enter a pairing code, type 0000 into the edit field, and then press ENTER to finish pairing the display.
You must now configure JAWS to use the Bluetooth connection. Note that it is not necessary to first establish a USB connection before using Bluetooth. If you have not yet set up a USB connection with the Focus display, do the following:
Note: If you are using a third-party screen reading application, refer to the documentation that came with the software as these procedures might be different.
- Press INSERT+J to open the JAWS window.
- Press ALT+O to open the Options menu and select Braille to open the Braille Basic Settings dialog box.
- Press TAB to move to the Add Braille Display button and press ENTER.
- In the list of braille displays, choose Focus and press the SPACEBAR to select it, and then choose Next.
- In the Select the output port edit combo box, choose Bluetooth.
- Choose next and make sure that the Focus is selected as the primary display.
- Select Finish and you are instructed to restart JAWS in order for these changes to take effect. Select OK to close this message and once more to close the Braille Basic Settings dialog box.
- Quit and restart JAWS and your Focus Blue is now communicating with JAWS over Bluetooth.
If you are currently using the Focus display over USB and you want to switch the connection to use Bluetooth, do the following:
- Press INSERT+J to open the JAWS window.
- Press ALT+O to open the Options menu and select Braille to open the Braille Basic Settings dialog box.
- In the Default Braille Display combo box, make sure Focus is selected then choose Modify Settings.
- In the Select the output port edit combo box, choose Bluetooth.
- Select OK and you are instructed to restart JAWS in order for these changes to take effect. Select OK to close this message and once more to close the Braille Basic Settings dialog box.
- Quit and restart JAWS and your Focus Blue is now communicating with JAWS over Bluetooth.
Pairing with a Mobile Device
Watch a brief video to learn more about pairing Focus with an iOS device, or continue reading to pair your braille display with iOS or Android devices.
You can use the Focus Blue as a Bluetooth display with mobile devices that run Apple’s iOS and Google’s Android operating systems. For more information, refer to one of the following pages.
Refer to the Focus Blue User’s Guide for more information about managing connections.
Setting the Time
The time is always displayed as part of the Focus status message. To set the time, do the following:
- Press the Menu button to access the display configuration menu.
- Press DOTS 4-5 CHORD or a Rocker bar to navigate to Clock and press Dot 8 or the Right Shift button.
- The hours value will be selected when the Clock configuration opens. Use the Rocker bars to set the hour.
- Press DOTS 4-5 CHORD or the Right Panning button to select the minutes value and use the Rocker bars to set the minute.
- Press DOTS 4-5 CHORD or the Right Panning button to select the seconds on/off value and use the Rocker bars to toggle the seconds display on or off. When enabled, seconds are shown as part of the time on the status message.
- Press DOTS 4-5 CHORD or the Right Panning button to select the AM/PM/24-hour value and use the Rocker bars to choose AM, PM, or 24-hour time. The option for 24-hour time is indicated by the number 24 (dots 2-3 and dots 2-5-6).
- Press DOT 8 or the Right Selector button to save your changes and close the Clock submenu. Press Z CHORD (DOTS 1-3-5-6 CHORD) or the Left Selector button to close the submenu without saving.
- Press Z CHORD (DOTS 1-3-5-6 CHORD) or the Left Selector button to exit the configuration menu.
Scratchpad
The Scratchpad enables you to take notes as well as read braille formatted (BRF) and plain text (TXT) books. To start the Scratchpad, simultaneously press the Menu button and the letter N (DOTS 1-3-4-5). You are placed in a new blank file where you can immediately begin entering content. To save the file to the included Micro SD card, simultaneously press Right Shift and the letter S (DOTS 2-3-4).
To transfer BRF and TXT files for reading in the Scratchpad:
- Press and hold the Left Panning button while simultaneously powering on the display. Connect the Focus to your computer using the supplied USB cable, and the display will be recognized as a removable USB drive.
Note: If you use a screen reader such as JAWS over USB, it is recommended that you turn on speech or use a Bluetooth connection as braille will currently not work over USB when the Focus is being used as a storage device. You will also not be able to use the Scratchpad while in this mode. - On the PC, open the folder containing the files you want to copy, select the files you want, and then press CTRL+C.
- Navigate to and open the USB drive to display the contents of the Micro SD card.
- Open FSI, Focus5, Scratchpad, Books, and then press CTRL+V to place the files into this folder.
- Once you have finished transferring files, press the APPLICATIONS key on your computer while focused on the USB drive, and choose Eject.
- Power the Focus off and back on and you will once again be able to use the Scratchpad as well as receive braille output from your screen reader over USB.
To open a file, simultaneously press Right Shift and the letter O (DOTS 1-3-5). Select the Notes folder to open files you created in the Scratchpad or select the Books folder to open files transferred from your computer.
For more information on using the Scratchpad, simultaneously press Right Shift and the letter H (DOTS 1-2-5) to open Help.